Saturday, September 27, 2014

4S Power for Version 2!

I have been slowly gathering parts for new and improved version of my mini-quad. Changes are being made based on what I learned from the first build and also information I have picked up on the forums over the past few months. While I have made several changes to the frame setup (more on that later), one of the biggest changes is to the power system I will be using for Version 2. Below is a break-down of the components I have chosen based on research of forums and seeing what has worked for others.

Below: motors, ESC's, voltage regulator, battery and flight controller

Motors: Cobra Motors CM2204 1960kv. These are about the same price as the SunnySky 2204s however they are a lower kv since I am going to a 4s battery pack. When I first saw the pictures of these online, I didn't expect them to be high quality, but after getting them in hand they seem to be very well made. Not to mention people seem to be getting pretty good performance out of them. I have HQProp 6030's on here for the pictures, but I plan to try the 6045's too.


ESC: Flyduino KISS 18A 2-4s capable, these suckers are tiny tiny. It's going to take some patience to solder these up, but they should be worth it. Everyone who has them says they perform like no other ESC's on the market right now, and the FETs are supposedly pretty high end.


Flight Controller: still using the Naze32 acro, although this one is black and I soldered the pins differently. I saw twitchity do this to save some space and liked it. I am also going to clock this board 90* when I install it this time because I had to remove the battery from the airframe to get to the USB the way I installed it in the prototype mini-quad.


Battery: Thunder Power RC 1300mAh 4s 70c G8 Pro Force. For size comparison it is almost identical size/weight to the 1800mAh 3s I was using. This should keep the overall weight of the copter the same but provide better max thrust. I am hoping the flight times will be similar because it is only slightly less watt hours than the 3s pack, however the new motor and prop combo will also effect that.


Prepping the ESC's: I found it easier to use the magnifying glass on the helping hands to tin the pads. I began by putting a little flux on each pad, which is hard to see in the photo.


Tinning the pads: in this photo I have tinned the power, ground, and signal pads. Probably going to use 20awg for the power and ground, and 26awg for the signal wire. I need to put in an order for those materials this week.


All 4 ESC's are ready to be soldered


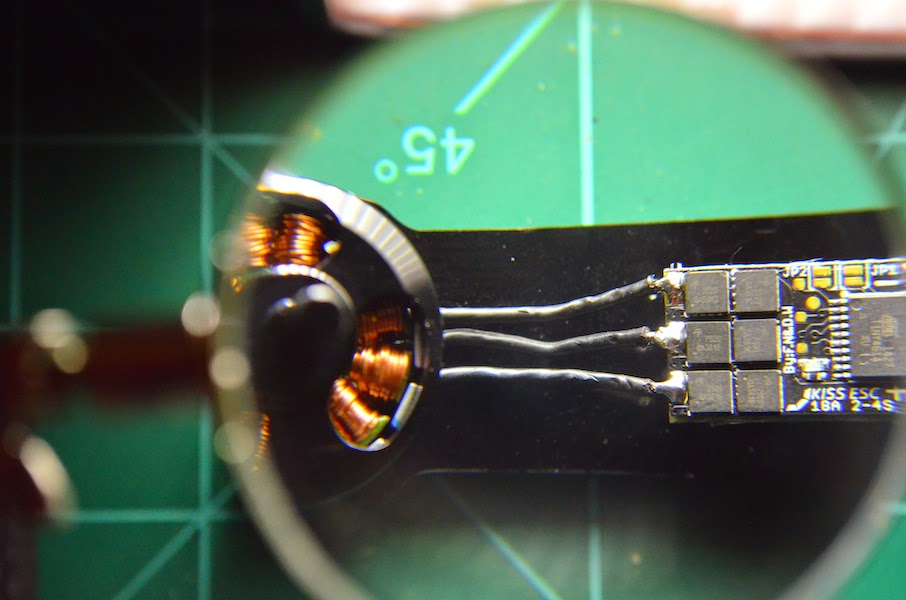
Motor Connection: Originally I was thinking about nesting the ESC's in the dirty frame like I did on the first build. However I decided against it because these ESC's don't have heat sinks and I'd rather avoid finding out the hard way that they didn't get enough cooling. Instead, I have soldered them close to the motor in the airflow of the prop. The short motor leads I believe have lacquer coating which has to be burned off. I applied my soldering iron for a while to help burn off the lacquer. I used a meter to check the resistance between leads and compared it to one of the cobra motors that still had the factory extension wires in place. Both motors measure the same resistance in ohms so I hope that is a good enough test.


Securing the ESC: At this point I was just testing out some heat shrink I had to see if it would shrink tight enough around the ESC. I have plenty of this stuff left, so I will cut this back open to finish the power and signal wires later. Although I am considering trying to find some thinner clear heat shrink so I can see the LED on the ESC's.


Now only 3 more ESC's and motors to connect!

Wednesday, September 24, 2014

New Project? Gimbal Motors?


Above: Recently acquired RCTimer GBM2804 Gimbal Motor

So recently Blackout released its new 330 Quad. If you haven't seen it, you can check it out at minihquad.com. It's a 330mm quad which is intended to carry a GoPro camera.

Turns out the Blackout 330 pretty much does what I wanted a small quad to do when I set out to design my own mini-quad. I admit, I was actually aware this was being worked on when I started my own project. I was just too impatient to wait for it to come to market. I also really wanted to make something that I could call my own! As a bonus, my quad also ended up being slightly smaller than the Blackout 330 since it measures 290mm motor to motor.

Recently, several of the beta testers have been flying the Blackout 330 with a HobbyKing brushless gimbal! That's something my mini-quad is not capable of doing.

So, my next project is to create my own mini gimbal quad! Hence the picture of the gimbal motor above. I have already started to acquire parts so that I can begin design of the frame. Currently I have the following parts ordered and/or on hand for this build:
  • 2x RCTimer GBM2804 Gimbal Motors
  • 1x HobbyKing Micro Alexmos 2-axis Gimbal Controller
As far as electronics go, I plan to use the same setup recommended for the Blackout 330:
  • Cobra 2208 2000kv motors
  • 20A ESCs (thinking about trying the Multirotor Superstore ones)
  • 4s Battery (thinking Lumenier 2250mAh should do it)
  • Naze32
FPV equipment:
  • GoPro Hero 3+ (mounted in gimbal)
  • FatShark 600tvl or similar board cam (fixed mount)
  • RC 3-input video switcher
  • Lumenier GoPro Hero connector
  • Immersion RC 600mW VTX
  • Immersion RC Spironet antenna
Yes, I could buy the Blackout 330, but this will be more fun and I think I can make a few improvements to the frame layout by designing it with the gimbal in mind. More design specifics/goals to come in followup posts!

Version 2 Mini-Quad

I have not posted much about recent happenings, but I am definitely working on a revised version of the mini-quad. Not much has changed, just little revisions to make it easier to strap the battery in. I also moved the video transmitter antenna mast hole forward a little bit. The rest of the changes are mostly aesthetic.

The one big change is not to the frame itself, but to the power system. The current setup includes Sunnysky X2204S 2300kv motors and an 1800mAh 3s battery, with Lumenier 12A ESC's.

The new setup will include includes Cobra 2204 1960kv motors, KISS 18A ESCs, and 4s battery pack. This should give the quad a bit more pep and also better lifting capabilities. I wil test initially with the 6x3 HQ Props, but eventually 6x4.5 props will also be tested.

I just received the G10/FR4 for the frames and will be sending it to Twitchity to have a couple copies of the revised frame cut. Hoping to have the Version 2 frame flying by the end of October at the latest. In the meantime, I've come up with another new quad project, which I will start posting details about soon!

Tuesday, September 9, 2014

Receiver Tray with Removable Antenna Mast

New idea for Version 2 Mini-Quad!

After getting the first prototype done, I decided I wanted to eventually buy a Pelican style case to transport the copter, some batteries, and possibly the transmitter around securely. In order to do this I need to be able to remove the antennas from the copter. It's easy enough to unscrew the Immersion RC Spironet video antenna, but the way I've been mounting the antenna masts for my Futaba receivers makes them hard to remove.

Basically what I've been doing is taking a thin piece of lexan, trimming it to fit the base of the receiver, and then creating a leg to mount a plastic antenna mast. I usually bend the lexan to a 90 or 45 degree angle to position the antenna mast. The antenna mast itself is secured to the lexan with heat shrink, and lastly I mount the receiver to the lexan with double sided tape. This method has worked well and it allows the antenna mast to bend over if I were to clip an obstacle.

Below is a screenshot from Inventor Fusion of the part I will be sending to Shapeways shortly:

I designed this receiver tray around the Futaba 6106HFC FASST receiver I am using. The angled hole in the back is to insert the antenna mast in. I am almost done with the design but I am thinking I will add a provision for a small set screw just in case I need a little bit of positive lock on the plastic antenna mast tube. The receiver will be secured to the tray with double sided tape like I've been doing with most of my builds already. 

Maiden and First Flights for the Mini-Quad!

The videos pretty much tell it all:


Stay tuned because I definitely have some improvements in mind for a version 2.

3D Printed GoPro Housing Arrived!

The GoPro housing finally arrived, and it looks good! It seems to fit very well, as shown in the pictures below. The GoPro itself fits fine and the Lumenier GoPro connector also fits in the pocket as intended. I decided to use self-tapping screws to secure the GoPro connector and also to secure the GoPro holder to the frame.


The GoPro housing was the last piece of the puzzle, and now that I have it, the mini-quad is ready for it's first flights. Now the real fun begins!

New 12A ESC's for the Mini-Quad

So long story short, I somehow toasted one of the channels on my 12a 4in1 ESC. I am not sure exactly why it happened, but I have a notion that one of the motors had a pinched winding due to too much epoxy in the housing and the mounting screws protruding inwards. Anyways, I decided that if I was going to go through the trouble to re-wire the whole dirty section of the quad, I wanted to have separate ESC's in case this happened again.

After removing the 4in1 ESC from the frame, I began by making a power distribution board. This design is semi-inspired by the "cinecoin" in the Flying Cinema Cinetank. I made this using a dremel and a double sided copper clad PC board from Radio Shack.

New Power Distribution "coin":
All new 12A Lumenier ESC's soldered to power distribution:
New ESC's installed in dirty frame:

I also went ahead and replaced the motor that was connected to the burnt out channel on the 4in1 ESC to ensure that I didn't burn out any of the new ESC's for the same reason.